Zusammenfassung und direkte Antwort
Bereitstellen Hesco-Bastionsbarrieren effizient erfordert drei Schlüsselphasen: Vorbereitung der Baustelle, manuelles Aufklappen/Zusammenfügen, Und mechanische Befüllung mit Verdichtung. A trained crew of three workers equipped with a single loader can deploy and fill over $100\,\text{meters}$ of Hesco barrier per day. Proper ground leveling and avoiding oversized fill material are critical to preventing mesh deformation and ensuring structural integrity against blast or water pressure.
HESCO BARRIERS Standard-Installationsablauf
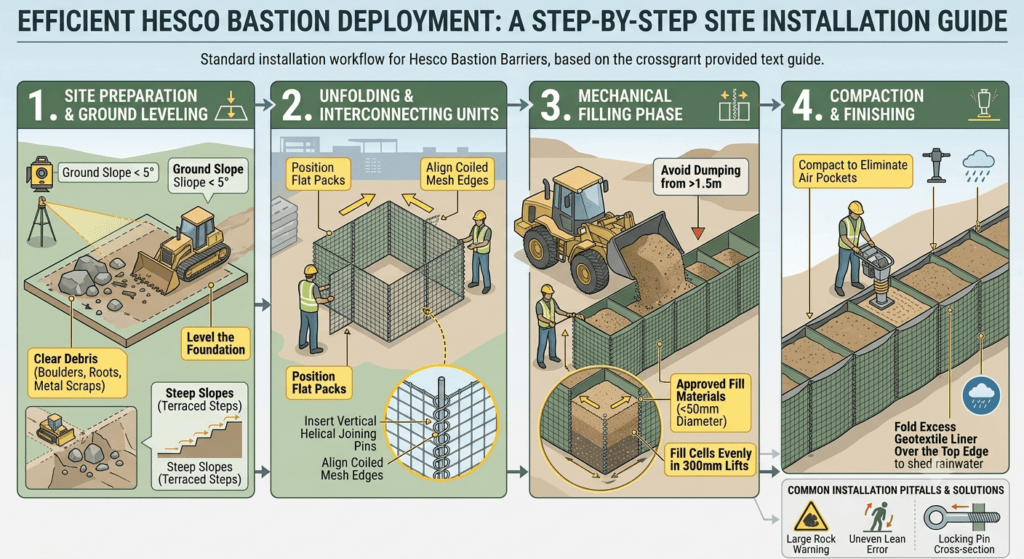
+-------------------+     +-------------------+     +-------------------+     +-------------------+
| 1. Site Prep &    | --> | 2. Unfolding &    | --> | 3. Mechanical     | --> | 4. Compaction &   |
| Ground Leveling   |     | Pin Connection    |     | Filling Phase     |     | Top Sealing       |
+-------------------+     +-------------------+     +-------------------+     +-------------------+
Detaillierte Schritt-für-Schritt-Anleitung
Schritt 1: Standortvorbereitung und Bodennivellierung
- Entfernen Sie Trümmer: Entfernen Sie große Felsbrocken, scharfe Baumwurzeln und Metallreste, die den Vliesstoff aus Geotextil durchstoßen könnten.
- Nivellieren Sie das Fundament: Ensure ground slope does not exceed $5^\circ$. For steeper slopes, cut terraced steps into the terrain to provide a flat base for each unit set.
- Entwässerungsprüfung: Stellen Sie bei Hochwasserschutzprojekten sicher, dass das Bodenfundament über eine ausreichende Tragfähigkeit verfügt, um ungleichmäßige Setzungen beim Füllen zu verhindern.
Schritt 2: Einheiten aufklappen und miteinander verbinden
- Flatpacks positionieren: Transportieren Sie flach verpackte Einheiten mit Gabelstaplern oder Kranwagen zur Baustelle.
- Netzkäfige aufklappen: Ziehen Sie die Endplatten nach außen, bis die Zellen eine quadratische/rechteckige Konfiguration haben.
- Verbindungsstifte einsetzen: Align the coiled mesh edges of adjacent units and insert vertical helical joining pins from top to bottom to create a continuous wall.
Step 3: Filling Mechanics
- Approved Fill Materials: Use locally available soil, sand, gravel, crushed rock ($<50\,\text{mm}$ diameter), or granular earth.
- Mechanical Equipment: Utilize a front-end loader, backhoe, or excavator with a wide bucket.
- Filling Technique:
- Fill individual cells evenly in $300\,\text{mm}$ lifts.
- Avoid dumping large buckets of material from heights greater than $1.5\,\text{m}$ to prevent geotextile tears.
- Fill corner cells first to anchor the unit in place.
Step 4: Compaction and Finishing
- Compact the top layer using a mechanical tamper or machine bucket pressure to eliminate internal air pockets.
- Fold excess geotextile liner over the top edge to shed rainwater and prevent erosion of the fill material.
Common Installation Pitfalls & Solutions
| Mistake | Operational Risk | Corrective Action |
| Using Large Aggregates ($>75\,\text{mm}$) | Tears geotextile fabric, causing fine fill leakage. | Filter fill material to ensure aggregate sizes remain under $50\,\text{mm}$. |
| Uneven Cell Filling | Causes units to lean or bow outwards. | Fill adjacent cells systematically in progressive lifts. |
| Overshooting Joint Pins | Loose joints reduce structural integrity under blast loads. | Ensure locking pins pass fully through all interlocking wire loops. |