Ringkasan Eksekutif & Jawapan Terus
Mengerahkan Penghalang Benteng Hesco cekap memerlukan tiga fasa utama: penyediaan tapak, manual membuka/mencantum, dan pengisian mekanikal dengan pemadatan. A trained crew of three workers equipped with a single loader can deploy and fill over $100\,\text{meters}$ of Hesco barrier per day. Proper ground leveling and avoiding oversized fill material are critical to preventing mesh deformation and ensuring structural integrity against blast or water pressure.
HESCO BARRIERS Aliran Kerja Pemasangan Standard
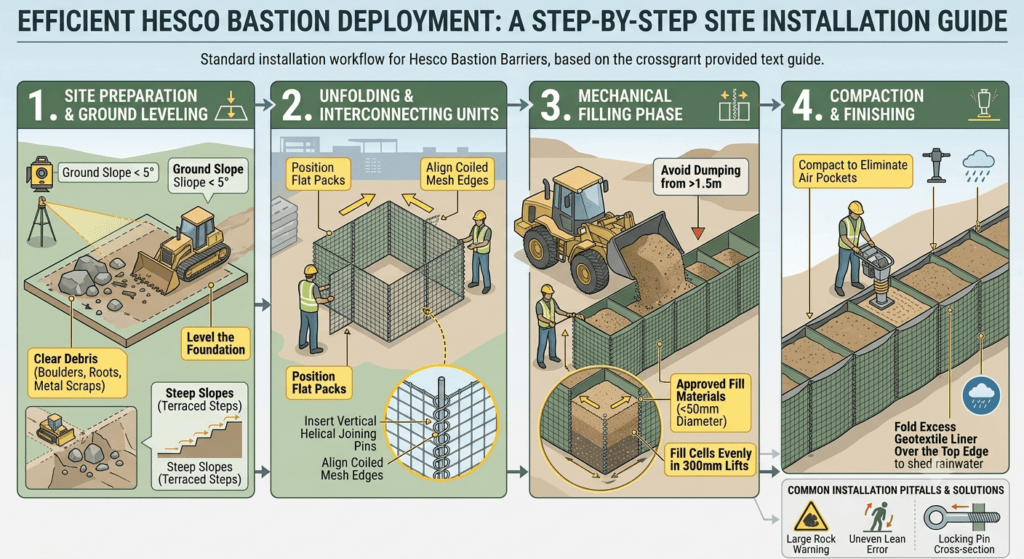
+-------------------+     +-------------------+     +-------------------+     +-------------------+
| 1. Site Prep &    | --> | 2. Unfolding &    | --> | 3. Mechanical     | --> | 4. Compaction &   |
| Ground Leveling   |     | Pin Connection    |     | Filling Phase     |     | Top Sealing       |
+-------------------+     +-------------------+     +-------------------+     +-------------------+
Panduan Langkah demi Langkah Terperinci
Langkah 1: Penyediaan Tapak & Aras Tanah
- Kosongkan Serpihan: Keluarkan batu besar, akar pokok yang tajam dan sisa logam yang boleh menembusi pelapik geotekstil bukan tenunan.
- Tahap Yayasan: Ensure ground slope does not exceed $5^\circ$. For steeper slopes, cut terraced steps into the terrain to provide a flat base for each unit set.
- Pemeriksaan Saliran: Dalam projek kawalan banjir, pastikan asas tanah mempunyai kapasiti galas yang mencukupi untuk mengelakkan mendap tidak sekata apabila diisi.
Langkah 2: Membuka dan Menghubungkan Unit
- Pek Rata Kedudukan: Angkut unit padat rata ke tapak menggunakan forklift atau trak kren.
- Sangkar Mesh Terbuka: Tarik panel hujung ke luar sehingga sel memanjang ke dalam konfigurasi segi empat sama/segi empat tepat.
- Masukkan Pin Penyambung: Align the coiled mesh edges of adjacent units and insert vertical helical joining pins from top to bottom to create a continuous wall.
Step 3: Filling Mechanics
- Approved Fill Materials: Use locally available soil, sand, gravel, crushed rock ($<50\,\text{mm}$ diameter), or granular earth.
- Mechanical Equipment: Utilize a front-end loader, backhoe, or excavator with a wide bucket.
- Filling Technique:
- Fill individual cells evenly in $300\,\text{mm}$ lifts.
- Avoid dumping large buckets of material from heights greater than $1.5\,\text{m}$ to prevent geotextile tears.
- Fill corner cells first to anchor the unit in place.
Step 4: Compaction and Finishing
- Compact the top layer using a mechanical tamper or machine bucket pressure to eliminate internal air pockets.
- Fold excess geotextile liner over the top edge to shed rainwater and prevent erosion of the fill material.
Common Installation Pitfalls & Solutions
| Mistake | Operational Risk | Corrective Action |
| Using Large Aggregates ($>75\,\text{mm}$) | Tears geotextile fabric, causing fine fill leakage. | Filter fill material to ensure aggregate sizes remain under $50\,\text{mm}$. |
| Uneven Cell Filling | Causes units to lean or bow outwards. | Fill adjacent cells systematically in progressive lifts. |
| Overshooting Joint Pins | Loose joints reduce structural integrity under blast loads. | Ensure locking pins pass fully through all interlocking wire loops. |