خلاصه اجرایی و پاسخ مستقیم
استقرار موانع سنگر هسکو به طور موثر به سه مرحله کلیدی نیاز دارد: آماده سازی سایت، باز کردن/پیوستن دستی، و پر کردن مکانیکی با تراکم. A trained crew of three workers equipped with a single loader can deploy and fill over $100\,\text{meters}$ of Hesco barrier per day. Proper ground leveling and avoiding oversized fill material are critical to preventing mesh deformation and ensuring structural integrity against blast or water pressure.
HESCO BARRIERS گردش کار نصب استاندارد
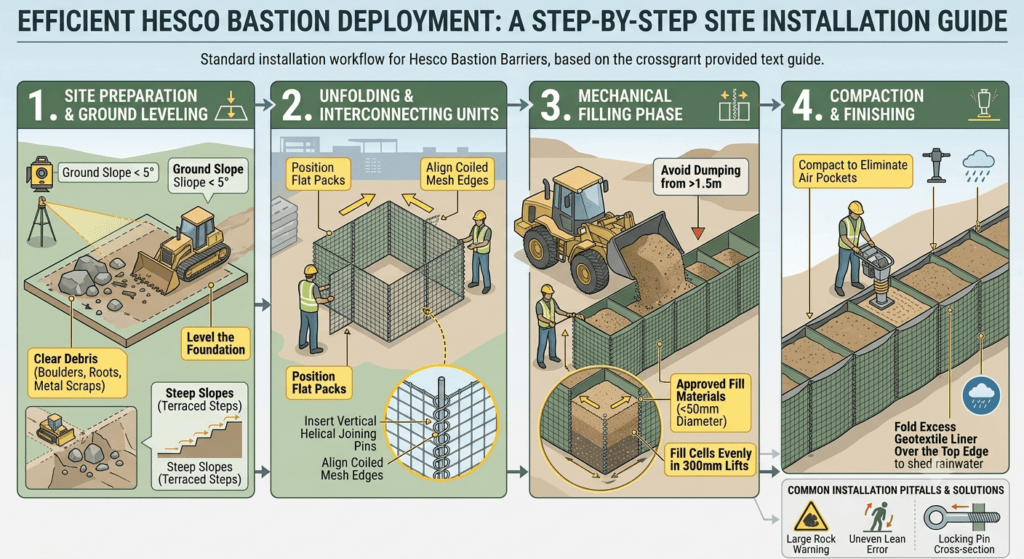
+-------------------+     +-------------------+     +-------------------+     +-------------------+
| 1. Site Prep &    | --> | 2. Unfolding &    | --> | 3. Mechanical     | --> | 4. Compaction &   |
| Ground Leveling   |     | Pin Connection    |     | Filling Phase     |     | Top Sealing       |
+-------------------+     +-------------------+     +-------------------+     +-------------------+
راهنمای گام به گام مفصل
مرحله 1: آماده سازی سایت و تسطیح زمین
- زباله های پاک: تخته سنگ های بزرگ، ریشه های تیز درخت و ضایعات فلزی را که می تواند آستر ژئوتکستایل غیر بافته را سوراخ کند، بردارید.
- سطح پایه: Ensure ground slope does not exceed $5^\circ$. For steeper slopes, cut terraced steps into the terrain to provide a flat base for each unit set.
- بررسی زهکشی: در پروژه های کنترل سیل، اطمینان حاصل کنید که فونداسیون زمین دارای ظرفیت باربری کافی برای جلوگیری از نشست ناهموار در هنگام پر شدن است.
مرحله 2: باز شدن و اتصال واحدها
- بسته های مسطح موقعیت: واحدهای دارای بسته بندی تخت را با استفاده از لیفتراک یا کامیون جرثقیل به محل حمل کنید.
- قفس های مش را باز کنید: پانل های انتهایی را به سمت بیرون بکشید تا سلول ها به شکل های مربع/مستطیل گسترش یابند.
- قرار دادن پین های اتصال: لبه های توری پیچ خورده واحدهای مجاور را تراز کنید و پین های اتصال مارپیچ عمودی را از بالا به پایین وارد کنید تا یک دیوار پیوسته ایجاد شود.
مرحله 3: مکانیک پر کردن
- مواد پرکننده تایید شده: Use locally available soil, sand, gravel, crushed rock ($<50\,\text{mm}$ diameter), or granular earth.
- Mechanical Equipment: Utilize a front-end loader, backhoe, or excavator with a wide bucket.
- Filling Technique:
- Fill individual cells evenly in $300\,\text{mm}$ lifts.
- Avoid dumping large buckets of material from heights greater than $1.5\,\text{m}$ to prevent geotextile tears.
- Fill corner cells first to anchor the unit in place.
Step 4: Compaction and Finishing
- Compact the top layer using a mechanical tamper or machine bucket pressure to eliminate internal air pockets.
- Fold excess geotextile liner over the top edge to shed rainwater and prevent erosion of the fill material.
Common Installation Pitfalls & Solutions
| Mistake | Operational Risk | Corrective Action |
| Using Large Aggregates ($>75\,\text{mm}$) | Tears geotextile fabric, causing fine fill leakage. | Filter fill material to ensure aggregate sizes remain under $50\,\text{mm}$. |
| Uneven Cell Filling | Causes units to lean or bow outwards. | Fill adjacent cells systematically in progressive lifts. |
| Overshooting Joint Pins | Loose joints reduce structural integrity under blast loads. | Ensure locking pins pass fully through all interlocking wire loops. |