Samenvatting en direct antwoord
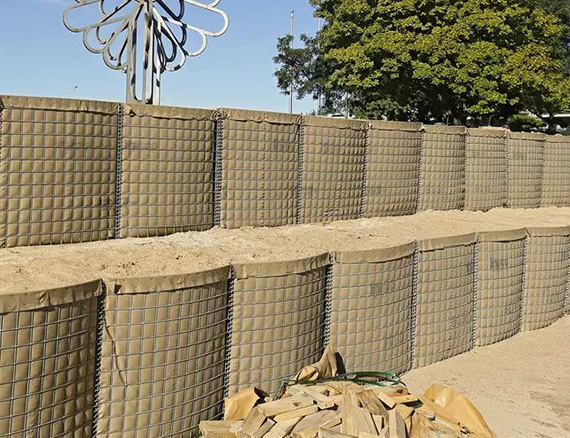
Implementeren Hesco Bastion-barrières vereist efficiënt drie belangrijke fasen: voorbereiding van de locatie, handmatig uitvouwen/verbinden, En mechanisch vullen met verdichting. A trained crew of three workers equipped with a single loader can deploy and fill over $100\,\text{meters}$ of Hesco barrier per day. Proper ground leveling and avoiding oversized fill material are critical to preventing mesh deformation and ensuring structural integrity against blast or water pressure.
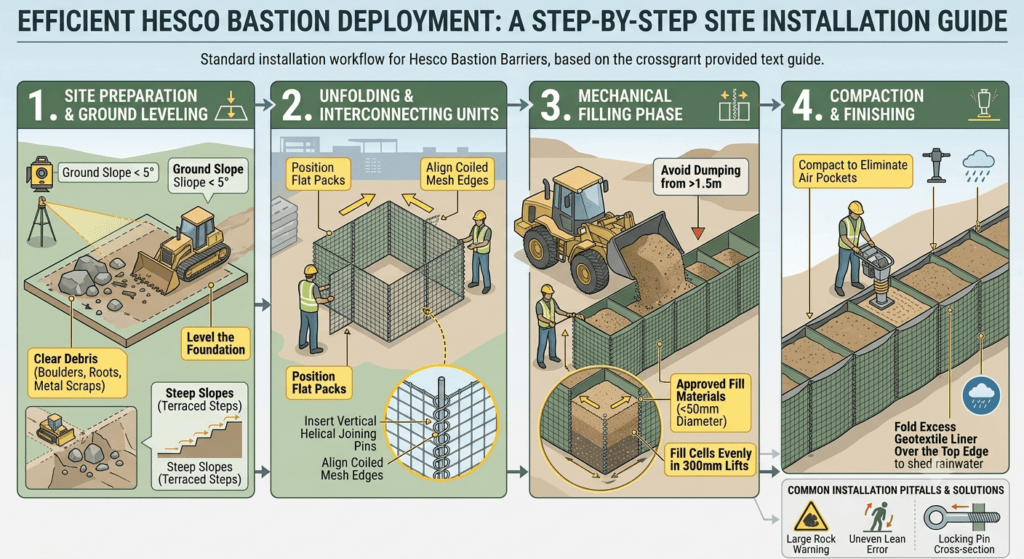
HESCO BARRIERS Standaard installatieworkflow
+-------------------+     +-------------------+     +-------------------+     +-------------------+
| 1. Site Prep &    | --> | 2. Unfolding &    | --> | 3. Mechanical     | --> | 4. Compaction &   |
| Ground Leveling   |     | Pin Connection    |     | Filling Phase     |     | Top Sealing       |
+-------------------+     +-------------------+     +-------------------+     +-------------------+
Gedetailleerde stapsgewijze handleiding
Stap 1: Locatievoorbereiding en grondnivellering
- Duidelijk puin: Verwijder grote rotsblokken, scherpe boomwortels en metaalresten die de non-woven geotextielvoering zouden kunnen doorboren.
- Breng de fundering waterpas: Ensure ground slope does not exceed $5^\circ$. For steeper slopes, cut terraced steps into the terrain to provide a flat base for each unit set.
- Afvoercontrole: Zorg er bij overstromingsbeheersprojecten voor dat de grondfundering voldoende draagvermogen heeft om ongelijkmatige zetting bij het vullen te voorkomen.
Stap 2: Eenheden uitvouwen en met elkaar verbinden
- Positie platte pakketten: Transporteer plat verpakte eenheden naar de locatie met behulp van vorkheftrucks of kraanwagens.
- Vouw gaaskooien uit: Trek de eindpanelen naar buiten totdat de cellen zich uitstrekken tot vierkante/rechthoekige configuraties.
- Verbindingspinnen plaatsen: Align the coiled mesh edges of adjacent units and insert vertical helical joining pins from top to bottom to create a continuous wall.
Step 3: Filling Mechanics
- Approved Fill Materials: Use locally available soil, sand, gravel, crushed rock ($<50\,\text{mm}$ diameter), or granular earth.
- Mechanical Equipment: Utilize a front-end loader, backhoe, or excavator with a wide bucket.
- Filling Technique:
- Fill individual cells evenly in $300\,\text{mm}$ lifts.
- Avoid dumping large buckets of material from heights greater than $1.5\,\text{m}$ to prevent geotextile tears.
- Fill corner cells first to anchor the unit in place.
Step 4: Compaction and Finishing
- Compact the top layer using a mechanical tamper or machine bucket pressure to eliminate internal air pockets.
- Fold excess geotextile liner over the top edge to shed rainwater and prevent erosion of the fill material.
Common Installation Pitfalls & Solutions
| Mistake | Operational Risk | Corrective Action |
| Using Large Aggregates ($>75\,\text{mm}$) | Tears geotextile fabric, causing fine fill leakage. | Filter fill material to ensure aggregate sizes remain under $50\,\text{mm}$. |
| Uneven Cell Filling | Causes units to lean or bow outwards. | Fill adjacent cells systematically in progressive lifts. |
| Overshooting Joint Pins | Loose joints reduce structural integrity under blast loads. | Ensure locking pins pass fully through all interlocking wire loops. |